Friday, April 26, 2013

Dolluxe All Dolled Up and Underlash B False Lash Product Review

Hi everyone!~ You may have noticed that I have been pretty quiet over here. I have been traveling a lot between the launch of Dolluxe at Anime Matsuri in Texas, a shoot for Meschantes Corsetry in North Carolina, and attending events here in DC. Needless to say, I've been one busy girl! I think my blogging schedule is going to change from Fridays to whenever I have time. Heheh.. ^.~

Enough about me... Let's get to a review that all of you guys have been asking for. A review of new Dolluxe lashes!

Photo of my lashes from Instagram: @alexapoletti
While I am lucky enough to have the full line of Dolluxe lashes (and be featured on the amazing packaging!!!), I am going to review these lashes separately. I think they are all amazing, are all very different, and all deserve their time in the spotlight. :3 A lot of my fans are new to lashes, so this is going to be a review and tutorial on how to apply lashes mixed together.

I am going to start with my favorite pair for an everyday look for big anime eyes. My favorite combination to achieve this look is Dolluxe's All Dolled Up (#4) and Underlash B (#8). You can buy each set in a 3 pack for $25 or singles for $10 USD.  


My wonderful friend Tin Tin is the perfectly kawaii face on this packaging. Not only is she an adorable model, she is an AMAZING artist. Check out her page and give her a "Like" here: Tin Tin's Facebook and Instagram 

For my top lash, I am going to use All Dolled Up. Each pack of lashes come with a great adhesive if you don't already have lash glue.


My bottom lash is Underlash B which also comes with glue.


*NOTE: Before you apply glue, you should hold the lashes up to your eye first to measure them. Then you should trim the lash strip to fit the length of your eye. Since I have giant peepers, I forgot to photograph this step as I don't normally need to trim mine.  

My current favorite brand of lash glue is DUO which is what I will be using to apply my lashes today. I use the Dark-Tone which is glue that dries black. This is great if you have thick liner because it will just help darken your liner and blend. Just as a general warning: If you are not good at putting on lashes, you should get glue that is white and dries clear so you don't mess up your makeup by getting black glue everywhere. The glue sample that is included with the Dolluxe lashes is white/clear and is a great adhesive. 


To apply the glue, you'll just squeeze the glue until it comes out just a little. You can either apply the glue directly to the lash if you feel like you have control of the glue, or you can put the glue on the end of a makeup brush or pull the cotton off a Q-tip and use that to apply the glue along the strip of the lashes for more control. You want to put the glue on the false lashes, not along your own lash line.

It is very hard to take pictures while doing this... It's a 2-hand process haha. :p

If the strip of this pair looks a little frazzled, it's because I've already used them 3 other times! Since the lashes are so full and don't need mascara, you can use them over and over again!

Wait 15-30 seconds or until the glue is tacky before applying your lashes. If you apply too soon, the lashes won't stay where you put them.

There are tons of different ways to apply lashes. You can use your fingers or tweezers and you can start from the inside or out. Whatever is comfortable and easiest for you. Personally, I just use my fingers and start from the outside. I do the top lashes first.

I start from the outside to make sure that I am placing them in the right place. I usually line the end up right along the end of my lash line, but a lot of gyaru looks will have you place the lash out a little farther than your natural line to give the appearance of a larger eye. 


If you have trouble getting the inside to stick where you want it, you can push it into place with tweezers, the back of a makeup brush, or a damp Q-tip.

After the lashes are in place and feel pretty secure but aren't completely dry, I push the front side up and hold it in place so the lashes stick up and look fuller.


Now it's time to apply the lower lashes! 
Normally I would apply both top lashes first before moving to lower lashes, but I wanted to be able to do a side by side comparison of a completed eye and a lashless eye.

This time, I am going to trim the bottom lashes for a different look. These bottom lashes are beautiful with a full strip as seen here, but today I want to try shortening them! I wanted to trim these where there would just be three big lash sections for my lower lash. If you have smaller eyes and think the longer end is too much for your eye, you could trim it where there are three on the shorter side and it will have the same effect. :)


Trimmmmyy trim trim.
Glue time!


It gets easier the more you do it! Don't forget to wait for the glue to get tacky! 

To apply the lower lash, try to get up underneath your lower lashes so you're not gluing them down to your face. Again, I start on the outside because it is easy for me to find the right placement.


Once the outside is in the right spot, it's easy to move the inside to the right spot! When the strip is smaller like this, it is easier to work with and control. That said, I've found the Dolluxe lashes extremely flexible and easy to apply even with the full length band. The bands are ultra-thin and flexible so they go where you want them to go. I've tried (and failed) with many cheap lashes and trust me. These are worth the price.

Then I touch up my eyeliner on the bottom to help blend the lashes to my natural lash line. For my waterline, I use Urban Decay's pencil in Zero.


Now let's see how crazy I look with just one eye done.... hehehe...


 Wow!!! See what a difference they make? I love false lashes!

Then you just repeat the steps above for your other eye and voila! It really doesn't take nearly as long as it seems in my explanation. I am just trying to be very thorough for the lash newbies. :3   


It's okay to make funny faces while applying. :3

Tada!!!


That's the end of my getting ready process! Then I just post my styling to my fan page and you get something like this:


That's it for Dolluxe's All Dolled Up and Underlash B review! Think you can rock these lashes? I'd love to see pictures of you guys wearing them! If you have any questions about selecting a lash or how to apply them, leave me a comment here or on my Facebook page!

Check out Dolluxe's entire lash line here:

Find more of me here:

Until next time, love birds. <3 xx


Friday, March 8, 2013

Bow Kuma: Handmade Hair Bow Product Review

Hi everyone! Today we are going to be taking a look at one of my favorite online bow shops out there. Say hello to Bow Kuma


Bow Kuma is an online shop that specializes in perfect little handmade bows and are now expanding into apparel and jewelry. I originally met Bow Kuma just after my first giveaway ever on my fan page, back before their name change. You may know them as Dengeki Daisuki or from this photo I did with them, and while I appreciate the Japanese shop name, I'm a much bigger fan of the new shop name ~ Bow Kuma. Adorable!! *thumbs up*

Today I am going to be reviewing their bows. In my experience, I have found Bow Kuma to have some of the best handmade bows online. The quality is top notch and they even include adorable stationary in every package! For free! I love to have extra stationary to write little notes to you guys on. <3 <3 The fabric is durable and holds its form (It even withstands the abuse of my "bow box"!!). I've had bows from other shops that just get smooshed or the clip falls off or they are floppy and don't stand up. Not from Bow Kuma. I am a big fan of their quality.


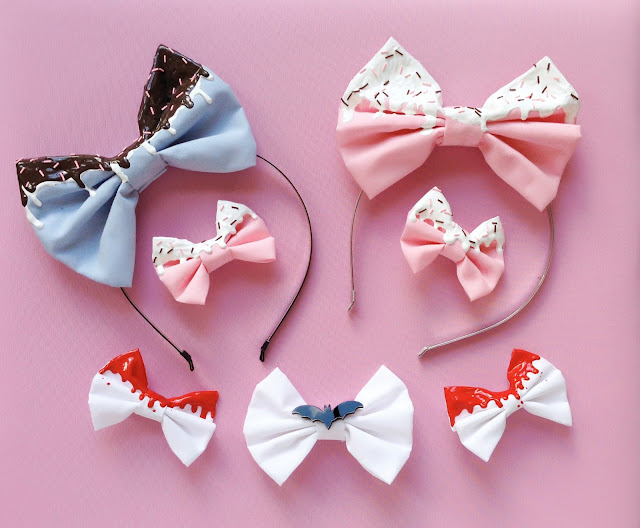
These are the bows I am going to be reviewing. This is an older collection by Bow Kuma, and they have since expanded their "drip" collection into all kinds of great colors, glow in the dark, and even a cookie bow! You can see in the photo the size differences of their large (two headbows), medium (bat bow), and small (pink cake and blood) size bows.

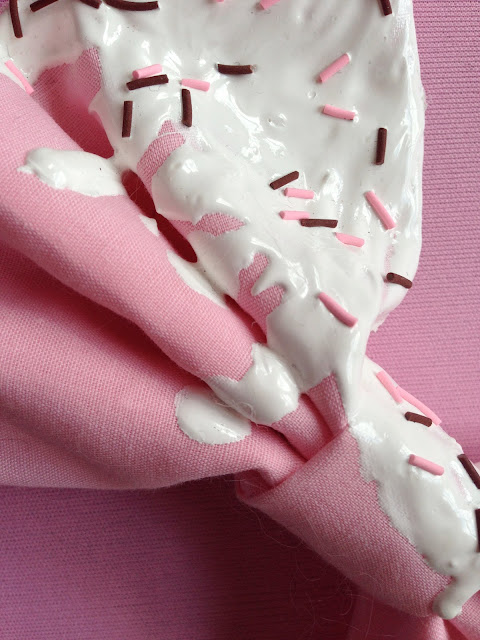
So let's kick it off with the blue cake headbow. There is actually a full set in this design, but I only have the headbow so I will focus on the headband. The fabric is light blue and the "frosting" is a vanilla/chocolate mix with pink sprinkles. This large-sized bow is secured to a flexible headband. The good thing about it the bow being glued into place is that it will never slide around and end up on a weird spot on your head. The bad part is that if you want it to be a center bow on the top of your head, you essentially have to break the bow to be able to slide it along the headband. It's pretty rare that I want a center bow because I tend to over-accessorize as it is, so I like that it is glued into place. It also helps ensure that I won't lose the headband! Here is the front and back of the bow:


It's beautiful!


Don't you just want to eat it?? The frosting is hard and helps the bow keep it's shape.


The ends of the headbands are wrapped. It's a very thoughtful gesture to make sure the headband does not dig into your head. THANK YOU, Bow Kuma! Nothing worse than a headache from your bow. >.<


I love this headbow for a sweet casual look! WARNING: People may try to eat your bow. Defend your bow by biting back. NOM.


Now... I *LOVE* this set. I love to do OTT sweet EVERYTHING and what is better than a pink cake bow with vanilla frosting to make things sweet?? I am so happy I have this full set! There is nothing cuter!!


The bow is light pink and has white frosting with pink and brown sprinkles. I'm getting hungry.


All of the medium and small bows have an alligator clip secured on the back. They are not two-way bows, meaning they don't also have a safety pin attached to the back to secure them to clothing or other items. They are exclusively hair bows.


~* <3 <3 <3 *~

Things are getting a little too sweet around here. I don't want to get carried away. Instead let's take a turn for the darker side of hair bows. Dripping blood and a bat bow. Yessss!


These bows are all white. The blood drip bows are the same as the cake frosting bows, just without the sprinkles because.... you know. That would be weird. The bat bow is just a solid white bow with a shiny acrylic (I think?) black bat stuck to the center. Check out how sexy he is:


Now prepare for me to eat your soul in 3... 2.... 1.....


NOM.

And as a happy surprise for all of you beautiful readers, Bow Kuma has provided a discount to my fans. 
When you check out, use the code ALEXA to receive 10% off when you spend $5.00 or more!

Check out all of Bow Kuma's current stock here:

& find more of me here:

To have your shop reviewed, email AlexaPolettiOfficial@gmail.com with the subject "*Shop Name* Product Review"

See you next Friday! xx


Friday, March 1, 2013

Circle Lens Review: Flora Blossom Series from Honeycolor.com

Hi everyone!!
Today I am reviewing the Flora Blossom series of circle lenses from Honeycolor Online Circle Lens Store

I thought I would kick things off with a something I get asked about all the time. Everyone wants to know about circle lenses. Which is the best? How comfortable are they? How do they look on light-colored eyes? Well here are some answers for you! 

As a model of all things kawaii, I get the exciting job of testing out lots of different lenses. Of all the lenses I have, I have to say that the Flora Blossom series is my current favorite series. At 15mm, they provide a great enlarging effect, the colors are vibrant and amazing, and they are very comfortable to wear.

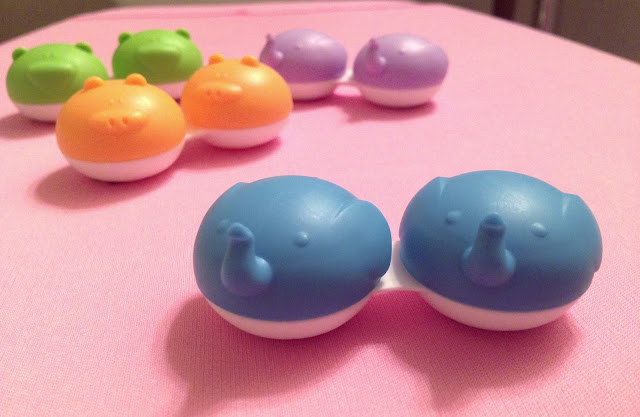
When you order from Honeycolor.com, you get the lenses in a little glass vial which is pretty standard across the board, no matter where you order from. I've always found their shipping to be very fast, especially considering they are coming from Malaysia and I am based in the US. The lenses also come with a complimentary adorable animal case to store your lenses in.


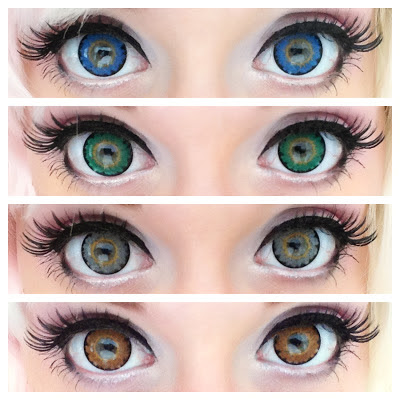
The Flora Blossom series comes in blue, green, brown, and grey. The design has a yellow/brown ring around the middle to help the lens blend into your natural eye color. The thin black outer ring gives the lens a slight dolly effect, but it's not as pronounced as the extremely dolly Dolly+ series.


Don't forget to let your new lenses soak in contact solution (not the liquid in the vial!) for at least 6-8 hours before wearing them. I know it's tempting to try them on right way, but your eyes will thank you in the long run!

6-8 hours later....

Let's try them on!
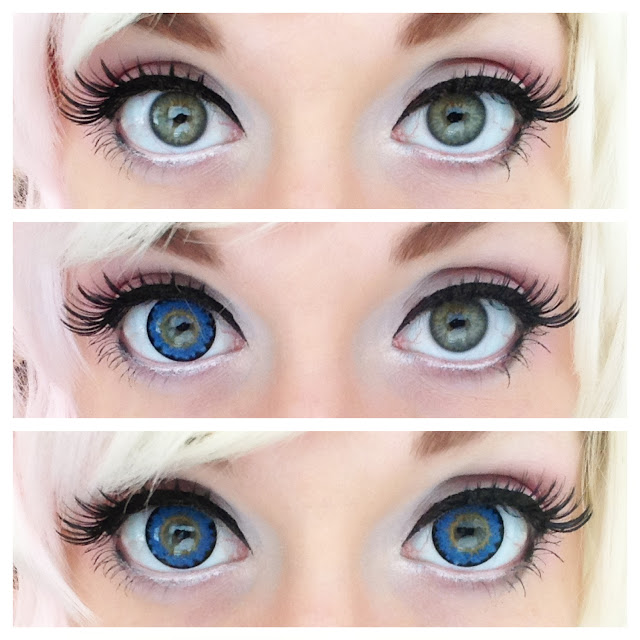
You can see in the first photo that my eyes are naturally a light green. When I was researching my first pair of circle lenses, I had a really hard time finding photos of circle lenses on light colored eyes. I hope this blog finds some people that are in the same boat that I was! You can also see in the second photo how crazy huge the enlarging effect is.

Flora Blossom circle lenses in blue, green, grey, and brown.

Which color is your favorite?

Here they are from farther away. Pajama party! Sometimes you just gotta rock sheep pants, ya know?

Flora Blossom circle lenses in blue, green, grey, and brown.
Overall rating:
Design~ 5/5
I love this design! As I said before, this is one of my favorite sets that I own.

Color~ 5/5
These show up great on my light eyes, but I can't speak for what they will look like on dark eyes.

Enlargement~ 5/5
15.0mm is very large!

Naturalness~ 3/5
Even though these are huge and the dark outer ring makes it pretty dolly, I wear the green ones on a regular basis (mostly for the enlarging effect since I have naturally green eyes) and always get compliments on how beautiful my eyes look while wearing them. They aren't too unnatural that they are scary, but they aren't exactly natural either.

-------------------------

Well, that's it! What do you think of the Flora Blossom series? I would love to hear your thoughts on the lenses and answer any questions you may have regarding... well... anything!

Thanks for reading! Find the entire Flora Blossom series here! :)
And of course, find more of me here: Alexa Poletti

Cheers! xx


Thursday, February 28, 2013

Welcome to my Review Blog!~

Welcome to my shiny new review blog! Yay!
Here I will be reviewing products from various online shops. You guys wanted it. Here it is!!  Basically, I want this blog to be an expansion of the "Sponsor Spotlights" that I host on my Facebook page. For an example, here is a Sponsor Spotlight I made for Bubblegum Emporium during my last giveaway. In fact, why don't you just check out my whole album of Sponsor Spotlights to get you warmed up for the blog? Baby steps, yall.

Teddy Necklaces in Lavender, Mint, and White from Bubblegum Emporium

The products I plan to review range anywhere from fluffy kawaii goodness and  circle lenses to spiky punk and alternative fashions, shoes, wigs, etc. I'd love to answer your questions you have about the products in the comments section.

To have your store reviewed, please email AlexaPolettiOfficial@gmail.com with the subject "*Name of your shop* Product Review"

In the meantime, find me on my main site here: Alexa Poletti
Thanks! xx